Pages

Sunday, July 12, 2020

A little update.

I can't quite believe it is now July 2020 and what a year it is turning out to be! During lockdown I’ve been reading through my Blogs and see that this one is seriously out of date! Here I am, letting you know that my Mountfield is still being added to and loved. I'm still enjoying this house just as much as ever and seeing it standing there gives me a lot of joy as I walk by it each day, not quite believing How far it has come!
My son once said to me years ago when I began this miniature hobby "What happens when it's finished Mum? " I said to him back then that it would give me pleasure just looking at it - and I do! 
 Now that all of the major work in terms of building, decorating and electrifying are done I'm now happy just adding all the little bits which 'makes a house a home' and can you believe even finishing off some things like the curtains! I always seem to leave them until the last!
Here are a few more up to date photos.....

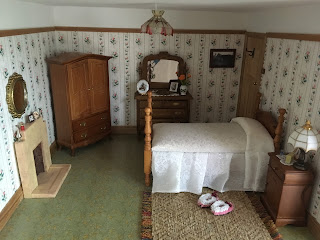
For the main bedroom I looked for a long time for a dressing table like my Mum and Dad had but I've never been able to find one. I found this one which is abit different to a lot I've seen so decided to use it, for the time being anyway. It was a bare wood one which I've stained and waxed.


I’ve put a few more things into the dining room but I still need a few more additions, like pictures on the walls  and the curtains and carpet!


Monday, August 31, 2015

Window treatments!

I've begun getting to grips with the curtains for all the windows in this house. There are lots so  there has been plenty to have a go at!! Eight in total and that's not counting the french door in the dining room...
I've already shared the kitchen curtains but they're worth showing again.


The front bay window is a very large one with a good sized window sill for displaying things on. I made a wooden pelmet for it and stained it to match the rest of the woodwork in the room. The material I've used is very similar to the curtains I remember us having.


 Trying different things to display and decided on the one below with family photos reduced to miniature size.


These are the nursery curtains


Again a wooden pelmet, this time painted.


The landing window with light shining through the curtains


I need to  make the pelmet for these yet

Nearly all the curtains are prints of some kind. You will notice that nothing much matches up with each other in the rooms and this was how it was in those days - if the curtains fit the window that was good! It was a pair of curtains and that was that! If they did happen to go with the overall colour scheme it was more a matter of good luck than good judgement....
I will update this page when I've got the other curtains finished - only the bathroom, parents bedroom, dining room and childrens room to go!


The dining room

This room has been abit of a challenge to me somehow, I'm not exactly sure why.....


 Maybe it's because when we were growing up we didn't have a separate dining room - our big dining table was in our large sitting room in a huge bay window area. As children we used it mainly for colouring and playing games on. I can't remember ever using it for eating on at all (but we must have done on occasion I suppose) Mostly our meals were had in the kitchen which was a good size.
It's been rather confusing as to how to get this room right.


The dining table and chairs and bureau look similar to the ones that my Grandma gave to my parents. We had a few 'hand me downs' pieces of furniture as did many in the 50s and 60s. The overall look of homes in those days was a 'mish mash' of many styles and eras! But it was home...


I have two Jane Harrop fireside chairs to make up which will be positioned near the fireplace (I just hope they will fit in!)


I'm also toying with the idea of fitting a delft rack around the room...more to follow!


Monday, January 19, 2015

The children's room

It's taken me awhile to get around to this room but once I got started it seemed to come together quite well. As I've mentioned throughout the blog I have been trying to fashion this house on my childhood in the late fifties and early sixties. My brother and I had twin divan beds with wooden headboards and try as I might I didn't seem able to find anything like that in 1:12th scale. My first thought was to make them from scratch but after seeing a couple of cheap little beds at a fair I decided altering these would be the easiest way to go.
This is the one I found..

So I then had to begin the task of taking it all apart and removing the foot board and getting it back together!


By taking off the foot board and staining the headboard in a 'teaky' colour this gave me something as near to the ones we had. Next some bedding....


Candlewick bedspreads were the next stumbling block. I've not been able to find anything to replicate this in miniature apart from some cotton fabric with a candlewick type pattern on it. And it seems to have done the job.....(I couldn't find candy striped sheets either!) I just need to make some eiderdowns now.
                                               

The chair between the two divans is one made up from a Jane Harrop kit. I didn't want anything too big or too fancy and this has done the job nicely I think. A chair like this was our bedside table when we were little!
No bedside lights in those days! Well not until we were much older....
                                            

The chest of drawers is a barewood one which I've stained and waxed.
                                         

The wardrobe is one I've had for awhile and seems to fit in here well. 
                                                 

I bought the little book shelf from Pudsey Fair. I think it's home made as I haven't seen another one like it and it's just the job for displaying the books and games.
                                                  

I couldn't resist buying this llittle dress from a fair - so cute!
                                                  

So that's my progress so far on this little room. There are one or two odds and ends to do. The fireplace needs to be glued in place and I need to find a little rug to put between the beds....


Sunday, November 02, 2014

A new cooker for the kitchen

I've been looking for a suitable cooker for this kitchen for awhile. I seem to remember ours in the fifties was more modern than the very old fashioned gas cookers that are available in miniature. With this in mind I opted for one from Elf Miniatures rather than the Phoenix white metal one.


This one is the nearest I could get in similarity to the one we had at home.
I think it looks ok back in the corner there.


I've added a few bits to the kitchen cabinet too.


So this next photo is how the kitchen is looking up to now.


Just the fourth wall to finish off now and a few more accessories.


Making up some kits.

To ease myself back into mini-ing again after the summer I made up a few kits that I'd bought ages ago - some from Jane Harrop, some Phoenix white metal ones and one from Elf Miniatures. The white metals ones are always abit of a headache for me as the pieces are so very tiny - however I've managed them and I'm pleased with them.

First I put together this little chair., it needs painting yet and will go in the childrens' room - a chair was my only bedside table when my brother and I were growing up so this will do the job nicely.


Next I made up a tiny stool and box to go in the kitchen. Jane's kits are lovely to do. You do need a gluing jig though to keep the parts properly aligned and square but she has some great, authentic little things.


 I thought a cardboard box would come in handy for under the sink...


And onto the Phoenix kits.....

The Ascot water heater looked difficult and that's why I've put it off for ages - all those tiny pieces! I couldn't even find it at first, that's how long it's been. Anyway it's turned out ok, though unfortunately I didn't have much space left when I came to add it to the kitchen - it's a little too near the curtains for my liking but I'm thinking that health and safety weren't as strict then as they are now!


Ever since I saw the Phoeonix coke stove/back boiler made up I knew I would like it in this house as it's identical to the one we had at home.


 I've painted it the same colour as ours was and put in a red bulb and left the ash grate door slightly open. I have memories of our cat Dinky snuggling up to sleep against it, she used to get so close that her tail singed!


The Delph cupboard I made up is amazing. It has glazed, sliding doors and a sloping front which were quite in vogue at this time. I struggled abit with it, gluing it together back to front at first (don't ask me how) but my hubby noticed it - I hate that - but I'm glad he pointed it out before I got any further on in the building of it...


I painted it blue (nothing matched in our house) and filled it with crockery.


Shelf lining. We always had shelf linings.


I love the way the doors slide and the front of the cupboard slopes.

So that's it for the kits at the moment. I have some easy chairs to do for the dining room but they'll have to wait as I need some suitable material to cover them. 


Electrifying continued.....

The hallway table lamp was next in line to be electrified...again this was an afterthought and for a long time it has been stood looking pretty but unlit!


This time I routed the wire along behind the skirting board and again addded a little socket and plug.
 Once I had the wire through to the pantry, heading in the right direction for the back of the property, I drilled a hole down through a corner in the pantry floor where it wouldn't be seen underneath the tiles.


This took the wire underneath the house where I covered it with sticky back carpet to protect it and which also helps when I need to move the house around with it being 3 dimensional.
So now I have a lovely lit lamp in the hallway.


Whilst I was in the hallway I added the stringer to the side of the stairs and a few  'oak' beams.


I think the hallway is just about finished now (famous last words)


A view from the stairs through to the front room.