Pages

Friday, November 08, 2013

Bathroom Suite now installed!

The bathroom suite arrived this week and after thinking I would never find one suitable for the era, I must say that I'm really pleased with it...!
I will 'tweak' it here and there eg paint the loo seat black (which will be more in keeping with the 1950s) and maybe think about changing the taps eventually but overall I'm happy with how it looks.....

It fits in perfectly size wise ..

I love the shape of the basin - so different to the usual dollshouse basins out there..
Lovely shaping to the bath

Sunday, November 03, 2013

Bathroom floor and walls complete!

I've used Richard Stacey black and white vinyl tiles for the floor. They were a dream to lay, they're so accurately cut and it was just a matter of using a tiny amount of pva glue....


As with the walls I made templates of the floor and  then stuck the tiles onto that. This will enable me to slide the whole floor out if ever I need to replace the lighting in the kitchen below.....I've never had to do this in a house yet but you can bet your bottom dollar, the one time I don't make a floor removable something would go wrong! Here are some photos of the finished floor and walls... 

 
This is just how I remember our bathroom looking when I was a little girl growing up in the 1950s


 Just waiting for the new bathroom suite to arrive now!


More tiling progress

After a little wait for more supplies to arrive I've continued on with the tiling...(I've had a busy week!)
I've now got all the tiles stuck onto the templates and done a 'dry run' of  putting them into position in the house.Here is what they look like in situ... Before they can be finally stuck in, I need the flooring down.


There were a couple of areas where the tiles needed trimming back a little and apart from one cracked tile I managed to do that without too much bother. I've left the cracked tile as trying to faff about replacing it would probably have resulted in more mess. I figured that in a house this age there would have been the odd cracked tile, so for the sake of realism and ease it's staying!
At the bottom of the walls I've used some 1/24th scale skirting board which I've painted black and scored to look like edging tiles...

Wednesday, October 30, 2013

Tiling the bathroom


I've decided to give the bathroom a complete makeover since adding the airing cupboard.
I'd bought some beautiful wall tiles from Traditional Elegance Dollshouse Tiles when I first got the house and then didn't use them! Going for the quicker option instead in my haste to get the house all decorated....
The room is all stripped back now and ready for painting. I'm keeping the walls white, tempting as it is to put up a patterned wallpaper!


Each tiny tile is being glued onto a heavy quality paper first. I chose paper over card as I didn't want too much bulk...doing the tiling this way, flat on a table out of the house is much easier than trying to struggle laying them directly on to the walls inside the house itself


I think these new tiles are much more in keeping with the era and also the beauty of laying them individually like this means I can choose how I want the pattern to look...
Here they are transferred into the house on the paper ready to be stuck on...


Airing cupboard and tank in situ

The airing cupboard is now  glued into the corner of the bathroom, complete with tank and full of household 'linens'


I had great fun searching through all my scraps of materials and arranging them on the shelves 


Then I needed to  add the ' required plumbing' - amazing what you can do with an empty paint container, cocktail sticks, beads, glue and paint!


Of course gluing it in place wasn't straightforward! Something can't have been quite square and there were gaps where the cupboard met the ceiling and adjacent walls. I wanted it to look as if it had been built in when the house was built so out came the Polyfilla and that was soon fixed!


Now ready for painting and tiling to begin!


Friday, October 25, 2013

Making an airing cupboard

I thought it would be easier to make the airing cupboard as a 'stand alone' structure initially ...then it will just be a matter of sliding  it into position when complete. Well that's the plan!
We all know the best laid plans though......

In position but not glued in - need to think of the wallpaper in here now....


Nothing is fixed in place yet


Slatted shelves made from 'Costa Coffee' stirrers!


Then glued onto battens...


I think I will leave the door fixed in an open position., little point in having detail in there and not being able to see it!


Tank ready for the pipework to be fitted....

Got the plumber in...!

Whilst having the house turned around to work on the kitchen last week I glanced at the bathroom above...
I haven't done much work on this room apart from the tiling and the flooring.
I have always planned on adding an airing cupboard in here indeed I had painted the hot water cylinder ages ago and came across it the other day whilst searching for something else.....
I thought it would be a nice addition to a house of this type and a fun little project to do.
I remember the airing cupboard at home when I was growing up and often had to go rooting in there for my clothes which my Mum had put in there to 'air off'...

I began with a paint pot like this one..


With it's slightly domed top it seemed just the right size and shape to make a water cylinder


Painted with copper paint and 'pipes' added

Wednesday, October 16, 2013

New Labels

I know it's only a small thing but...
The tins in the pantry had foreign labels on!
They just had to be changed!
I had bought a set of ready made 'tins' because I didn't know if I would be able to saw dowel accurately enough to make my own. After searching online and printing off a few more familiar 'names' I've now got a set of ones I recognise......not 100% certain if they're correct for the 1950s but they're better than the originals at least!


My favourite is the tin of National Dried Milk!
A few familiar names there.....
Could do with just a few more.....

Tuesday, October 08, 2013

A few more pictures....

I've added a few bits and pieces to the kitchen since I last posted...

I bought an ironing board only to find that it was stuck in the 'open'
 position arrgh! After some fiddling and poking I've managed to fold it and added some staining to age it abit...


Some of the packaging needs to be re - labelled with more familiar names
 so that will be a job for another day...


I have a few more things to go under here yet but I've made a start


I love that thermos flask - just like my Dad used to have!


Another view of the pantry area...notice the 'oil cloth' on the shelves...


Still lots more things to add...back to researching!


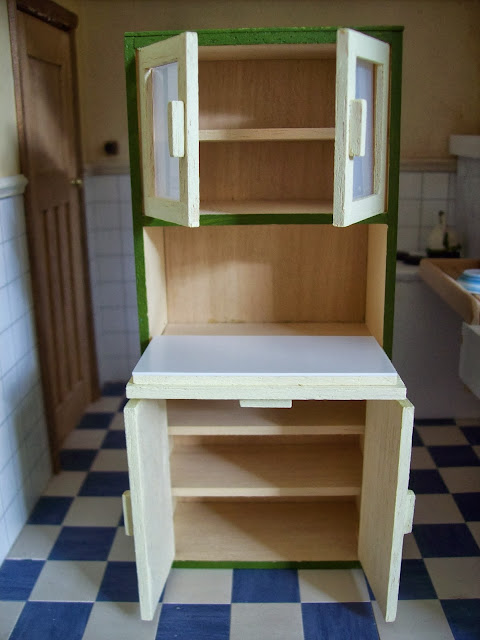
New cabinet in situ

I've put the cabinet in place on the back wall so that when it's full of things they will be seen....
There's not alot of space in this kitchen (just as there wouldn't have been in real life) and  I need room for the oven door to be able to open...


Just not quite room for it to be in the middle of the wall


Might have to move nearer the door....


A 'new addition' in the kitchen

The kitchen now benefits from a new cabinet made up from a Jane Harrop kit. I was a little daunted when I saw all the tiny pieces in the packet but I'm really pleased the way it has gone together. I remember one of these when I was a little girl in the 50s - ours was painted red and cream!