Pages

Friday, October 24, 2008

The bricklaying begins.....


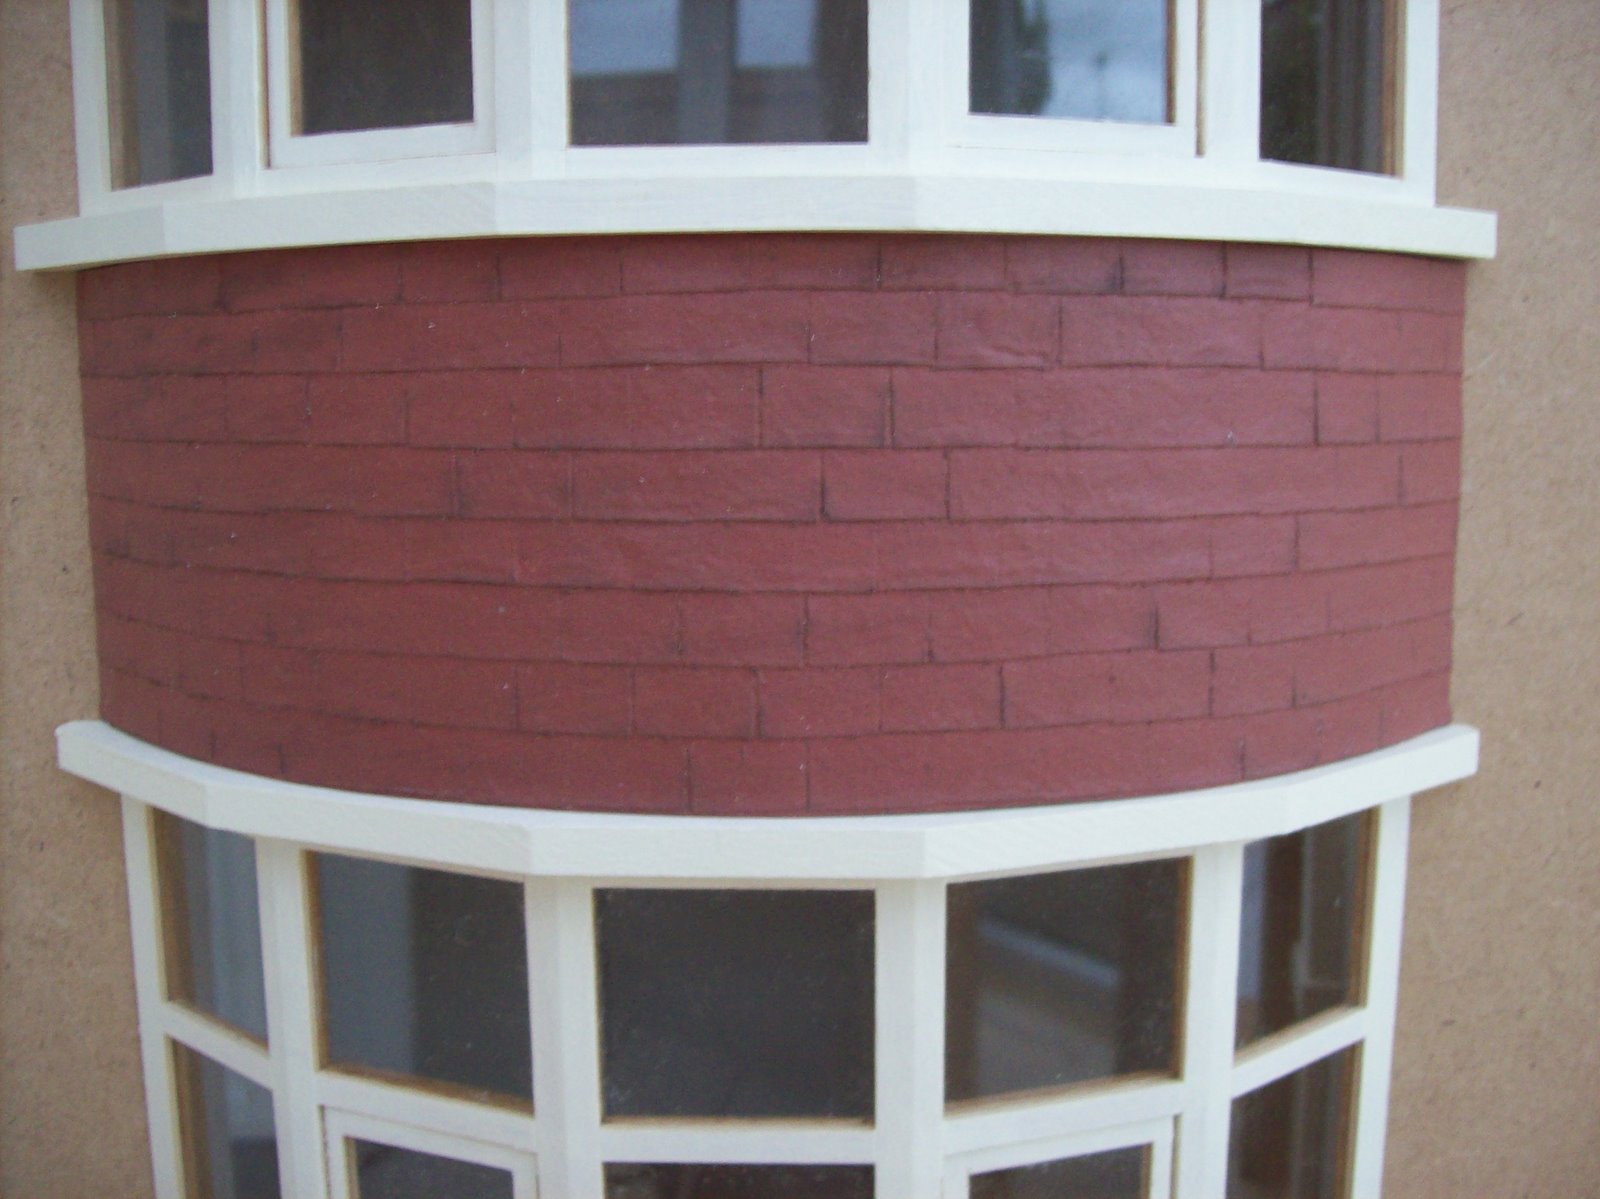
I've now decided to do the outside of the house with red brick on the lower half, hung tiles on the upper bay and pebbledash on the remainder of the upper walls. This would be 'in keeping' for a house of this era. So the 'mini-bricklaying has begun in earnest....the 'brickslips' are actually card, painted and covered with real brick dust.


  The hung tiles are an embossed sheet made of hand-pressed fibreglass.


I have also added 'lead flashing' made from Versi-tiles and cut into shape.


 The pebbledash for the walls will be a miniature stone coating effect paint. 


Sunday, October 19, 2008

Architectural Details

I have been undecided about what types of materials and the colours to use on the exterior decoration but after abit of research in a book on architecture I've begun to work on parts....


The front door has been painted black with a cream surround. I will be laying real quarry tiles on the porch floor.


 The back door is also painted black and the windows are in cream.


 I've used 'hung' tiles on the area between the upper and lower bay windows. 


For the roof I'm using red tiles from a pressed fibreglass sheet. I've done the gable roof so far with this and painted the gable end in white with black Tudor beams.


Friday, October 17, 2008

You sometimes need to 'play'

Today has been a day of doing lots of looking and visualizing how things might be. A large part of a new, creative project means lots of staring, thinking and planning thus saving expensive mistakes and regrets later on.


 To the uninitiated this may seem like 'playing' and I suppose it is a little but it's also a very necessary stage of the whole process....this is when I check areas that still need painting which aren't always immediately obvious whilst the house is lying flat in pieces.
Here's a view of how the whole house looks when taped together. Exciting!


 I take measurements for the new doors and windows, calculate the area of the roof and exterior walls for purchasing the decorating materials and to generally check that I know how things will fit together before the gluing stage.


 Also been having a look at interior decoration. Here is a picture of the wallpaper and woodwork I have in mind for the nursery (just 'blu-tacked' in place). The wallpaper is a copy of an original 40s pattern which I found and printed off ....


Thursday, October 16, 2008

The right era

It's relatively simple to put a dollshouse together anyone who has basic 'know how' or has put together a shelf or bookcase from 'mfi' can do it. But what is the fascination with getting a basic kit looking like a proper miniature replica of a particular era? Lets face it most people think of dollshouses as playthings for children and to some extent they would be right in thinking that however making a a proper miniature involves much much more. Speak to any true miniaturist and they will tell you that research is just as important in getting it right as putting the house together itself. The name dollshouse is a misnomer in some respects because as the name suggests it means a house for a doll but in real terms for any adult who pursues the dollshouse hobby, the ultimate aim is to replicate a setting or scene, so authentic in detail and realism that it rises far above what is commonly thought of as a 'dollshouse'. My goal in making my miniature properties is to achieve a 'glimpse' - a 'moment in time' if you like, encapsulated within those tiny walls....I hope you enjoy travelling back with me.

The big 'Paint In'

I've spent the last couple of days with a paint brush and roller in hand! The 'dry build' has had to be taken apart in order to give the bare mdf a couple of coats of emulsion., then put back together for some adjustments for the new window and door which I want to cut out.


  As you can see the house is three dimensional which is exciting and to further increase the realistic look about it I am going to add a french door to the dining room.


This is a view of the side of the dining room with a doorway which will become a french door.


The kit doesn't include a side door into the kitchen which is disappointing, only a window so not very realistic in that respect. I'm going to make a door where the window is now and put a new window in the back wall. More about my progress with that later.


 In the meantime I am continuing to do research about the 1930s which is when houses such as these would have been built. I am waiting for two books to arrive which should help me to get the correct look for the details and decoration of that era.

The little bits

In order to make the build easier it's important to prepare all the small parts like windows and doors in advance before the full assembly of the house ....here are the 
windows painted cream.

 
And the doors which I've stained in 'light oak' 


All the walls and ceilings!


Bay windows


Getting it together

The next stage is what is called the 'dry build'. The kit is put together without glue.....it's starting to look like a little building now...I love this part!


In the beginning......

 This is the story of my Mountfield Dollshouse being built from the Dollshouse Emporium kit... 
Look at all the pieces in the box! How will they ever become a miniature building....? Well first of all I needed to identify all the pieces and check everything was there. Next came the practice build...


I'm going to try and set this house in the 1950s era which was the time when I was a litte girl. Although I didn't live in a house like this one, I'm hoping to re-create some of the furniture, fixtures and fittings of those days.